Rims
Eyelets
We use eyelets on our box section rims to give some extra strength to a normally thin portion of the rim extrusion. The Atlas is currently the only rim we eyelet. Aero section rims do not require eyelets for strength, since we use extra aluminum through the spoke bed area of the rim. Some believe that eyelets aid in wheel building by creating a smooth socket for the spoke nipple to rotate in. We drill all of our rims, eyeleted or not, in a manner that allows for smooth spoke adjustment. You should always place a drop of lubricant between the rim and spoke nipple when building or making an adjustment.
Joining techniques
We use a unique sleeve joining process to create our rims. This process uses a joiner extrusion that fits perfectly inside the internal cavity of the rim, which is chemically welded in place once the rim is aligned to be perfectly round and flat. This joining process creates a very reliable rim while maintaining the strength properties of the aluminum at the join, unlike arc or resistance weld joining techniques which can lead to weak or brittle join sections.
Recommended spoke tension
We recommend building to spoke tension between 110kgf and 130kgf. Each rim may behave a bit differently; the mark of an excellent wheel builder is the ability to find the highest tension a rim will allow while maintaining its radial and lateral true.
Drilling angles
Spoke holes are drilled at an exit angle of around 4 degrees, and alternate from left to right flange bias at every other hole.
Machined sidewalls
On painted or anodized rims designed for rim brakes, we offer machined sidewalls (MSW) for superior braking performance. We remove the smallest amount of material possible to achieve a perfectly flat, raw aluminum braking surface. Machining silver or polished rims is not necessary so we opt to leave the sidewalls non-machined even if they are to be used with rim brakes. Those finishes provide great braking performance and do not blemish with wear. The material spared by not machining these rims lead to a longer service life of the rim sidewall.
Tubeless design
Our tubeless ready rims feature enhanced web geometry to allow tubeless tire setup. These designs feature tight tolerances in the bead area of the rim, and Velotape is required for proper tire fit with or without tubes.
Any rims that are not listed as tubeless ready must be used with tubes.
Optimal Spoke Count Suggestion
After factoring in a riders weight and gear, we suggest for individuals between 200 lbs to 229 lbs we recommend a front and rear spoke count of 32 each; for individuals between 230 lbs and 259 lbs, a front and rear spoke count of 36 each; for individuals between 260 lbs and 300 lbs we recommend a front spoke count of 36 and a rear spoke count of 40. These serve as simple guides for what wheelset will best serve you, please do not hesitate to contact us with questions you might have with your wheelset, we are happy to help!
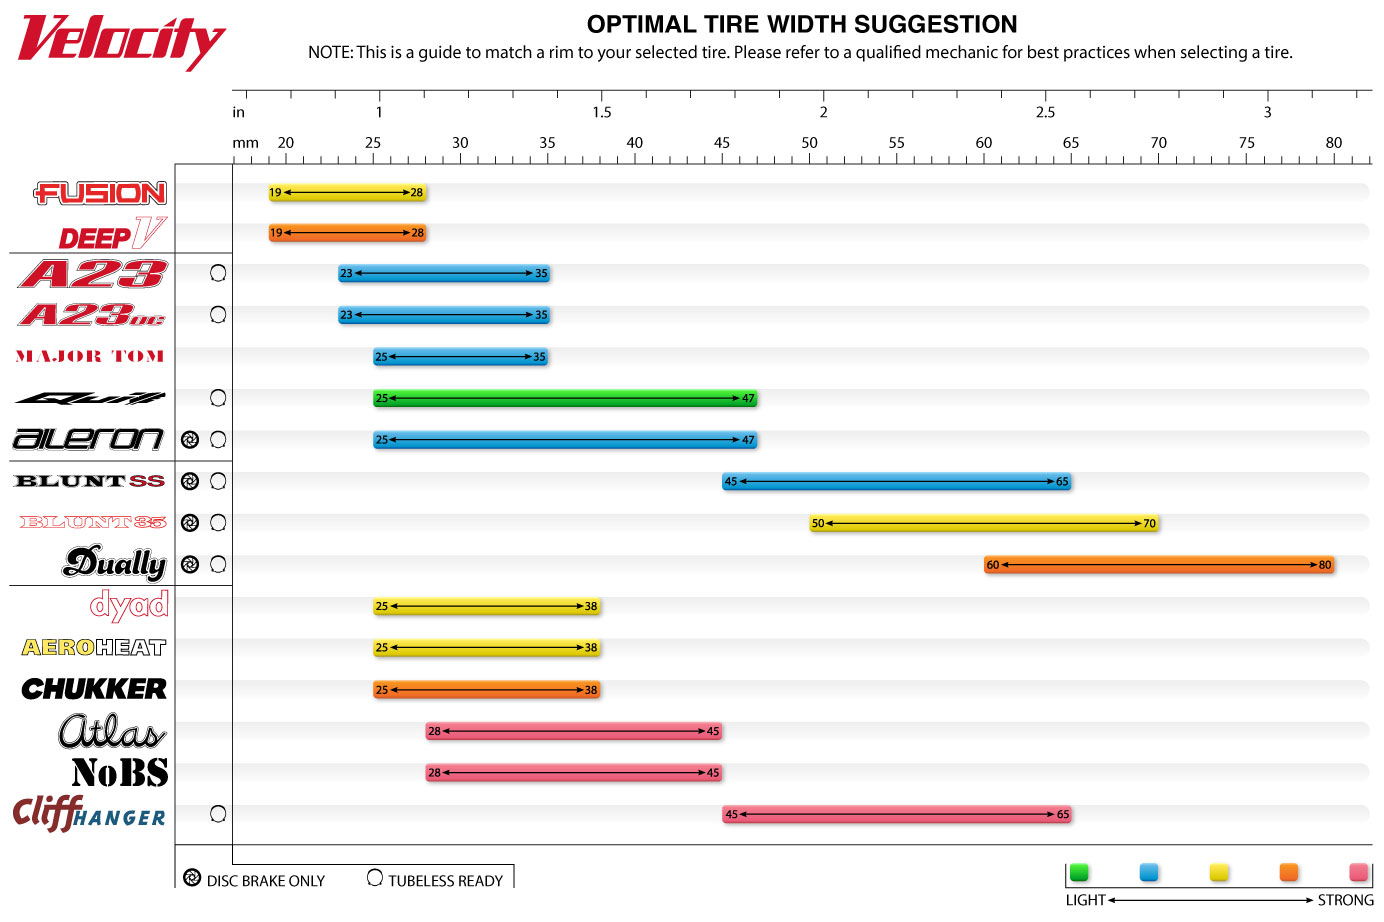
Optimal Tire Width Suggestion
Velotape Installation
Step 1
Clean the surface of the rim using a light degreaser and finsh with rubbing alcohol. Make sure there is no remaining residue or moisture on the rim before beginning to apply the Velotape.
Step 2
Starting in the center of the rim at the join (opposite the valve hole), begin to apply the Velotape. Make sure the tape is seated in the center of the rim with no air bubbles. Tape must completely cover all of the spoke holes.
Step 3
For applications under 45 psi (3.1 bar), tape once completely around the rim, pulling the tape tight. Overlap past the join by 2 to 3 inches (5 to 8 cm), and cut with a sharp pair of scissors. For applications over 45 psi (3.1 bar), do the same, but tape twice completely around the rim (two layers).
Step 4
Using a pointed punch (or phillips screwdriver(, carefully poke a hole through the Velotape at the valve hole.
Step 5
Remove the lock nut and washers from the provided valve. Insert the valve into the valve hole, matching the contour of the valve's rubber base to the contour of the rim's taped web. Install one or both provided washers onto the valve stem*. Install the lock nut onto the valve stem, and while pressing on the valve's rubber base with your thumb, tighten the lock nut as firmly as possible by hand.
*The white nylon washer is provided for shallow section rims, like the Velocity Dually. It provides extra spacing so the lock nut does not bottom out on the valve stem's threads prematurely. If you are installing the valve on a deeper section rim, you may use either the nylon washer, or the stainless steels washer, or both.


